Create multiple writing styles
A multiple entry allows you to distribute an accounting transaction from a specific account to several other accounts:
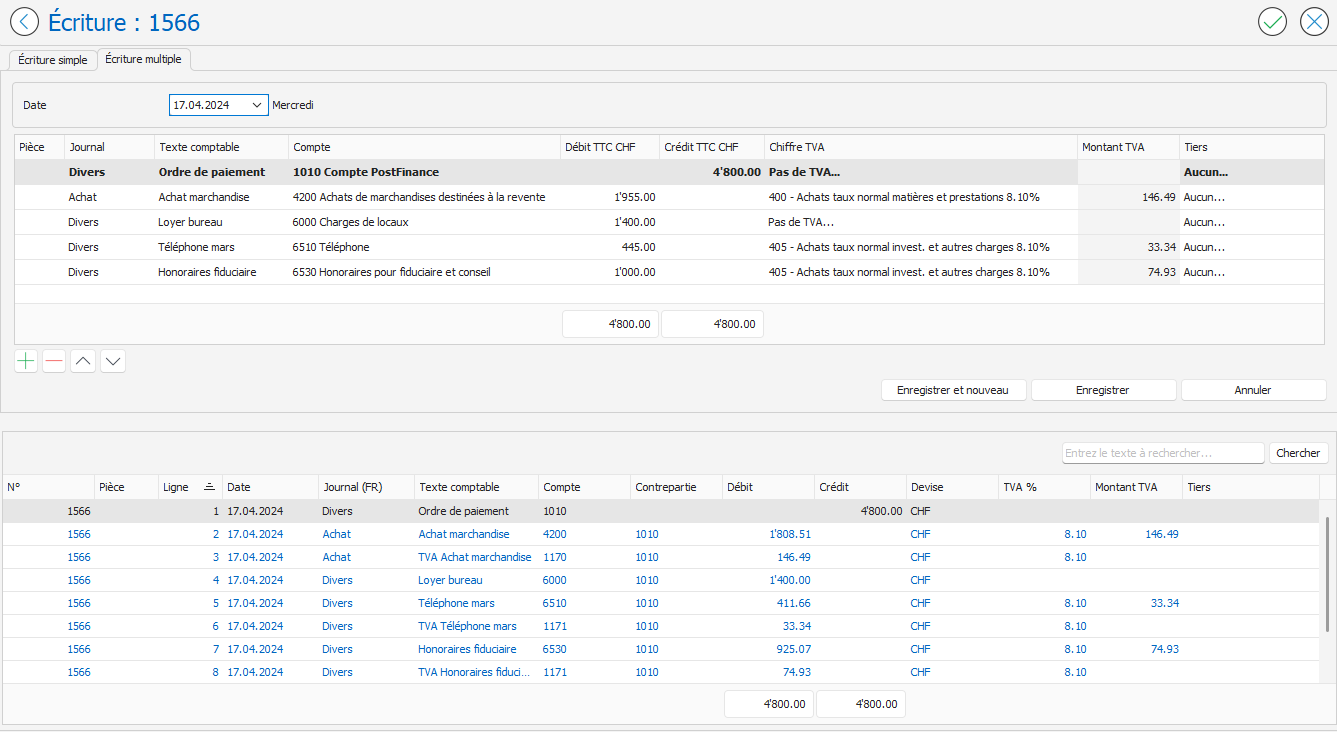
Create a multiple writing style
- Access the accounting entries page: Accounting menu, Financial accounting, Entries .
- To create a new multi-entry entry, click the New button.
at the top right of the page, then select the Multiple Writing tab.
- On the New Entry page, the first line is automatically bold because it is defined as the main line and contains the total account. Fill in the fields on the first line of the entry:
- Date : Date of entry. The day of the week is automatically displayed to the right of the field.
- Journal : Allows you to classify entries by assigning them to a journal. To create or modify a journal, click the button with the three small dots … located to the right of the drop-down list.
- Document : Numbering of accounting documents. This number facilitates the filing of your documents.
- Accounting text : Description of the journal entry line. During data entry, previously entered accounting descriptions are suggested by default in a drop-down list.
- Account : Account of the entry line.
 To access the chart of accounts, click on the button with the three small dots … located to the right of the drop-down lists for each account.
 - Debit (including tax) / Credit (including tax) : Debit or credit amount of the line.
- VAT figure : The VAT figure associated with the selected account is displayed by default. If the VAT amount is selected, clicking the button with the three dots … located to the right of the VAT amount displays the VAT window. The VAT window allows you, for example, to calculate the amount including VAT from the amount excluding VAT.
- Third Party : Allows you to associate a third-party address (business or individual) with the selected account. This enables you to generate an account statement specifically for that address.
- To add an additional row, click the New button.
located at the bottom left of the input area or use the down arrow key
The new line repeats the information from the previous line and the remaining balance to be allocated. Modify the data in the new line:
The order of the lines can be changed using the up and down arrows.located at the bottom left of the input area.
- After filling in all the lines of your multiple entry, you can click on one of the available buttons:
- Save button and new or (CTRL+N) : Saves the entry and creates a new empty multiple entry.
- Save button or (CTRL+S) : Saves the multiple entry without creating a new one.
- Cancel button: Cancels the current entry.
- The validated entry is displayed in the list at the bottom of the page:
- If you enter additional entries, they will be added to the list and become part of the same batch of entries. To edit an entry in the current batch, double-click one of the entry's lines in the list. The entry will then appear in the edit area and can be modified. For more information about batch entries, click here .
- To close the writing page, click the OK button.
or (CTRL + Enter) or (CTRL + W) . You can also click the Back button.
located in the top left corner of the page.
You can customize the display order of columns in a multi-entry book, adding or removing columns as needed. For more information, see the article Customizing the Display of Multi-Entry Books .By default, the first line is set as the main line and contains the total account. To change the main line: Right-click on the line in question, Set as main line .
It is important to note that only one line can be defined as the main line in a multi-line writing.